


Mx Space + Shiro + Nginx Proxy Manager 反向代理部署
Mx Space + Shiro + Nginx Proxy Manager 反向代理部署
前言
Mix Space 是一款简洁而不简单的个人博客系统,它够快,够现代。你可以利用它构建一个属于自己的个人空间,记录生活,分享知识。
本教程采用 Nginx Proxy Manager 反向代理前后端。
- 前端域名:
zinzin.top - 后端域名:
mx.zinzin.top
准备工作
你需要准备以下内容:
- 一台服务器(Linux 内核版本 > 4.18,运行内存 > 1GiB,教程以 Debian 11 为例)
- 已经映射到服务器 IP 地址的域名
- Docker 环境
安装 Nginx Proxy Manager 反向代理管理软件
-
在任意目录下创建
docker-compose.yml文件,内容如下:services:app:image: 'jc21/nginx-proxy-manager:latest'restart: unless-stoppedports:- '80:80'- '81:81'- '443:443'volumes:- ./data:/data- ./letsencrypt:/etc/letsencrypt -
保存文件后执行以下命令启动服务:
Terminal window docker-compose up -d# 或者docker compose up -d -
如果你是第一次使用,可以参考以下指南了解更多:
部署后端
-
拉取配置文件:
Terminal window cd && mkdir -p mx-space/core && cd $_# 下载 docker-compose.yml 文件wget https://fastly.jsdelivr.net/gh/mx-space/core@master/docker-compose.yml -
编辑
docker-compose.yml文件中的environment字段,配置以下信息:- JWT 密钥(JWT_SECRET):长度为 16 到 32 个字符的字符串,用于加密用户的 JWT。
- 被允许的域名(ALLOWED_ORIGINS):通常是前端的域名,多个域名用英文逗号分隔。
- 是否开启加密(ENCRYPT_ENABLE):如果需要加密,将
false改为true,并填写加密密钥。 - 加密密钥(ENCRYPT_KEY):长度必须为 64 位。
-
以下是一个示例配置,设置了 jwt 密钥和允许域名需根据自己的域名和密钥进行修改:
services:app:container_name: mx-serverimage: innei/mx-server:latestenvironment:- TZ=Asia/Shanghai- NODE_ENV=production- DB_HOST=mongo- REDIS_HOST=redis- ALLOWED_ORIGINS=zinzin.top- JWT_SECRET=Yy14003252791400325279volumes:- ./data/mx-space:/root/.mx-spaceports:- '2333:2333'depends_on:- mongo- redisnetworks:- mx-spacerestart: unless-stoppedhealthcheck:test: ['CMD', 'curl', '-f', 'http://127.0.0.1:2333/api/v2/ping']interval: 1m30stimeout: 30sretries: 5start_period: 30smongo:container_name: mongoimage: mongovolumes:- ./data/db:/data/dbnetworks:- mx-spacerestart: unless-stoppedredis:image: redis:alpinecontainer_name: redisvolumes:- ./data/redis:/datahealthcheck:test: ['CMD-SHELL', 'redis-cli ping | grep PONG']start_period: 20sinterval: 30sretries: 5timeout: 3snetworks:- mx-spacerestart: unless-stoppednetworks:mx-space:driver: bridge -
启动后端服务:
Terminal window docker-compose up -d# 或者docker compose up -d -
完成后,你会看到如下截图:

core完成截图
Nginx Proxy Manager 反向代理 Mx Space 后端
-
打开 Nginx Proxy Manager 的管理页面,按照以下步骤设置:

nginx步骤-1 
nginx步骤-2 注意:国内服务器可能因网络原因自动申请证书失败,需要多尝试几次,或上传证书。
-
成功后,访问
https://mx.zinzin.top/proxy/qaqdmin进行初始化设置:
初始化后端页面 -
部署成功后的后台页面:

后台管理页面
开始部署前端 Shiro
1. 设置主题配置
-
进入后台,点击”附加功能-配置与云函数”,填入以下内容:
- 名称:
shiro - 引用:
theme - 数据类型:
JSON - 数据:见下方 JSON 配置。
json
{"footer": {"otherInfo": {"date": "2020-{{now}}","icp": {"text": "萌 ICP 备 20236136 号","link": "https://icp.gov.moe/?keyword=20236136"}},"linkSections": [{"name": "关于","links": [{"name": "关于本站","href": "/about-site"},{"name": "关于我","href": "/about"},{"name": "关于此项目","href": "https://github.com/innei/Shiro","external": true}]},{"name": "更多","links": [{"name": "时间线","href": "/timeline"},{"name": "友链","href": "/friends"},{"name": "监控","href": "https://status.innei.in/status/main","external": true}]},{"name": "联系","links": [{"name": "写留言","href": "/message"},{"name": "发邮件","href": "mailto:i@innei.ren","external": true},{"name": "GitHub","href": "https://github.com/innei","external": true}]}]},"config": {"color": {"light": ["#33A6B8","#FF6666","#26A69A","#fb7287","#69a6cc","#F11A7B","#78C1F3","#FF6666","#7ACDF6"],"dark": ["#F596AA","#A0A7D4","#ff7b7b","#99D8CF","#838BC6","#FFE5AD","#9BE8D8","#A1CCD1","#EAAEBA"]},"bg": ["https://github.com/Innei/static/blob/master/images/F0q8mwwaIAEtird.jpeg?raw=true","https://github.com/Innei/static/blob/master/images/IMG_2111.jpeg.webp.jpg?raw=true"],"custom": {"css": [],"styles": [],"js": [],"scripts": []},"site": {"favicon": "/innei.svg","faviconDark": "/innei-dark.svg"},"hero": {"title": {"template": [{"type": "h1","text": "Hi, I'm ","class": "font-light text-4xl"},{"type": "h1","text": "Innei","class": "font-medium mx-2 text-4xl"},{"type": "h1","text": "👋。","class": "font-light text-4xl"},{"type": "br"},{"type": "h1","text": "A NodeJS Full Stack ","class": "font-light text-4xl"},{"type": "code","text": "<Developer />","class": "font-medium mx-2 text-3xl rounded p-1 bg-gray-200 dark:bg-gray-800/0 hover:dark:bg-gray-800/100 bg-opacity-0 hover:bg-opacity-100 transition-background duration-200"},{"type": "span","class": "inline-block w-[1px] h-8 -bottom-2 relative bg-gray-800/80 dark:bg-gray-200/80 opacity-0 group-hover:opacity-100 transition-opacity duration-200 group-hover:animation-blink"}]},"description": "An independent developer coding with love."},"module": {"activity": {"enable": true,"endpoint": "/fn/ps/update"},"donate": {"enable": true,"link": "https://afdian.net/@Innei","qrcode": ["https://cdn.jsdelivr.net/gh/Innei/img-bed@master/20191211132347.png","https://cdn.innei.ren/bed/2023/0424213144.png"]},"bilibili": {"liveId": 1434499}}}}
配置主题信息 提示:详细配置说明请参考官方文档:配置项。
- 名称:
2. 使用 Docker Compose 部署 Shiro
-
创建并进入
shiro目录:Terminal window mkdir shirocd shiro -
下载相关文件:
Terminal window wget https://raw.githubusercontent.com/Innei/Shiro/main/docker-compose.ymlwget https://raw.githubusercontent.com/Innei/Shiro/main/.env.templatemv .env.template .env -
修改
.env文件中的后台地址:Terminal window vim .env # 修改你的 ENV变量
env改为刚刚配置的后台接口 保存后启动服务:
Terminal window docker compose up -d# 或者docker-compose up -d -
后续更新镜像:
Terminal window docker compose pull
3. Nginx Proxy Manager 反向代理 Shiro
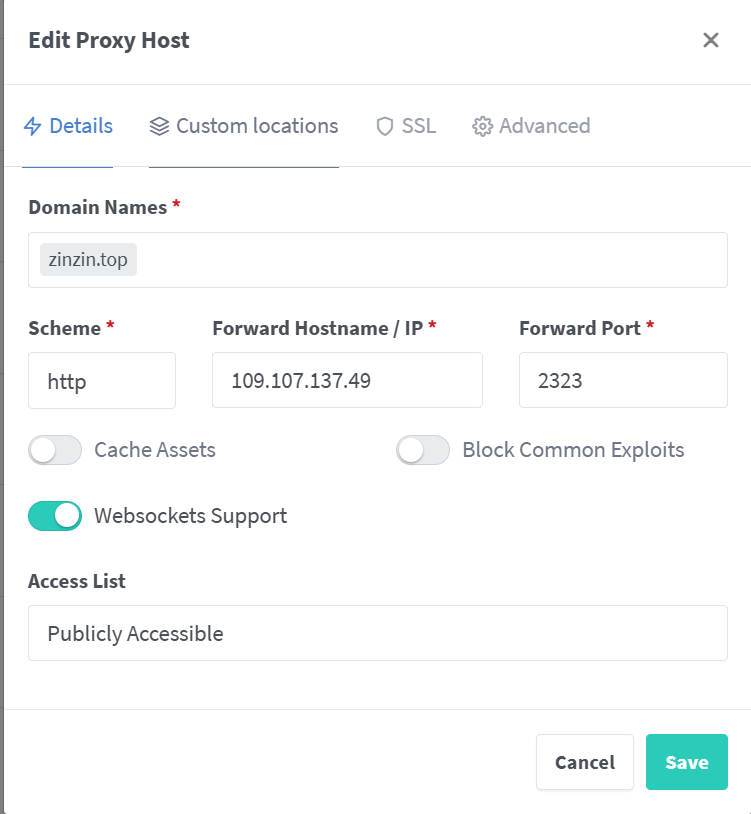
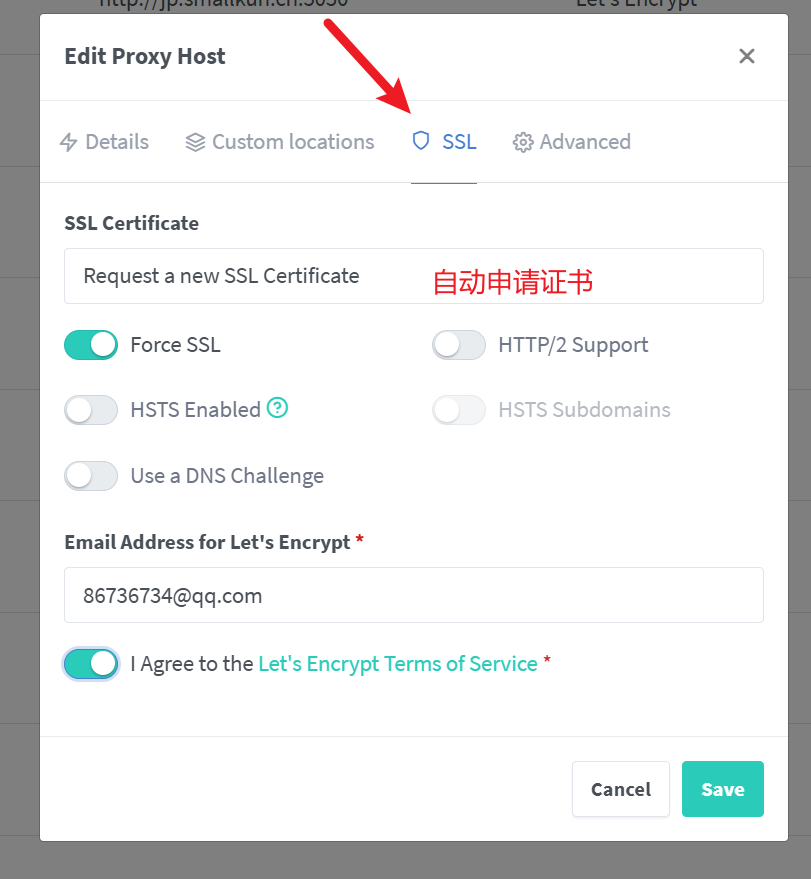
按照提示配置反向代理即可,如果服务都运行在同一台机器可以直接写内网 ip 地址。
最终访问主站点
完成所有部署后,访问 https://zinzin.top 即可看到主站点:
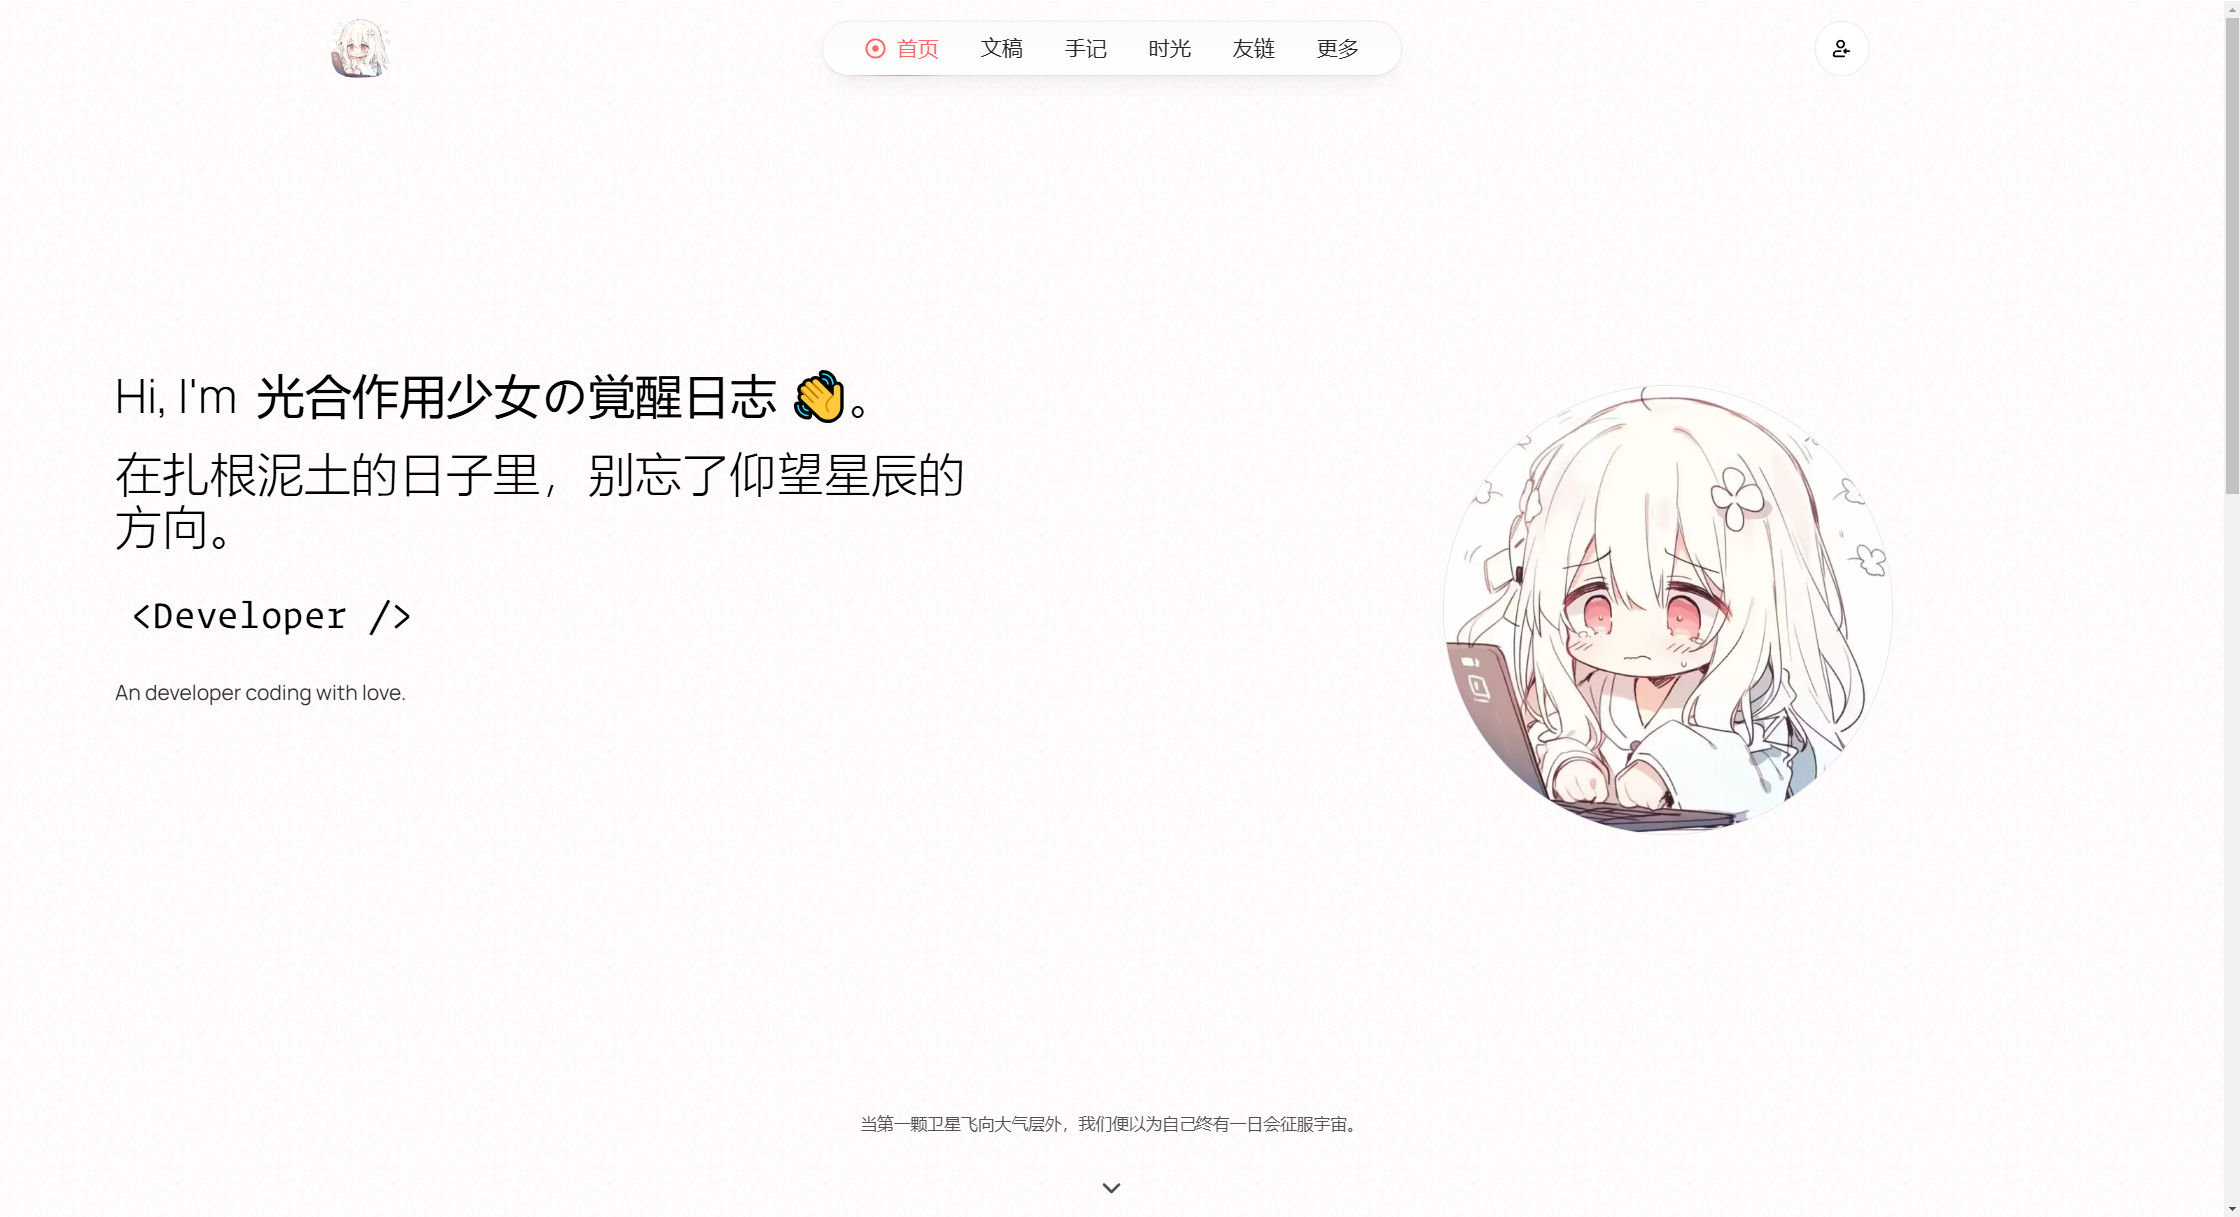
大功告成!!
如果部署中还遇到其他问题可以参考社区:
补充
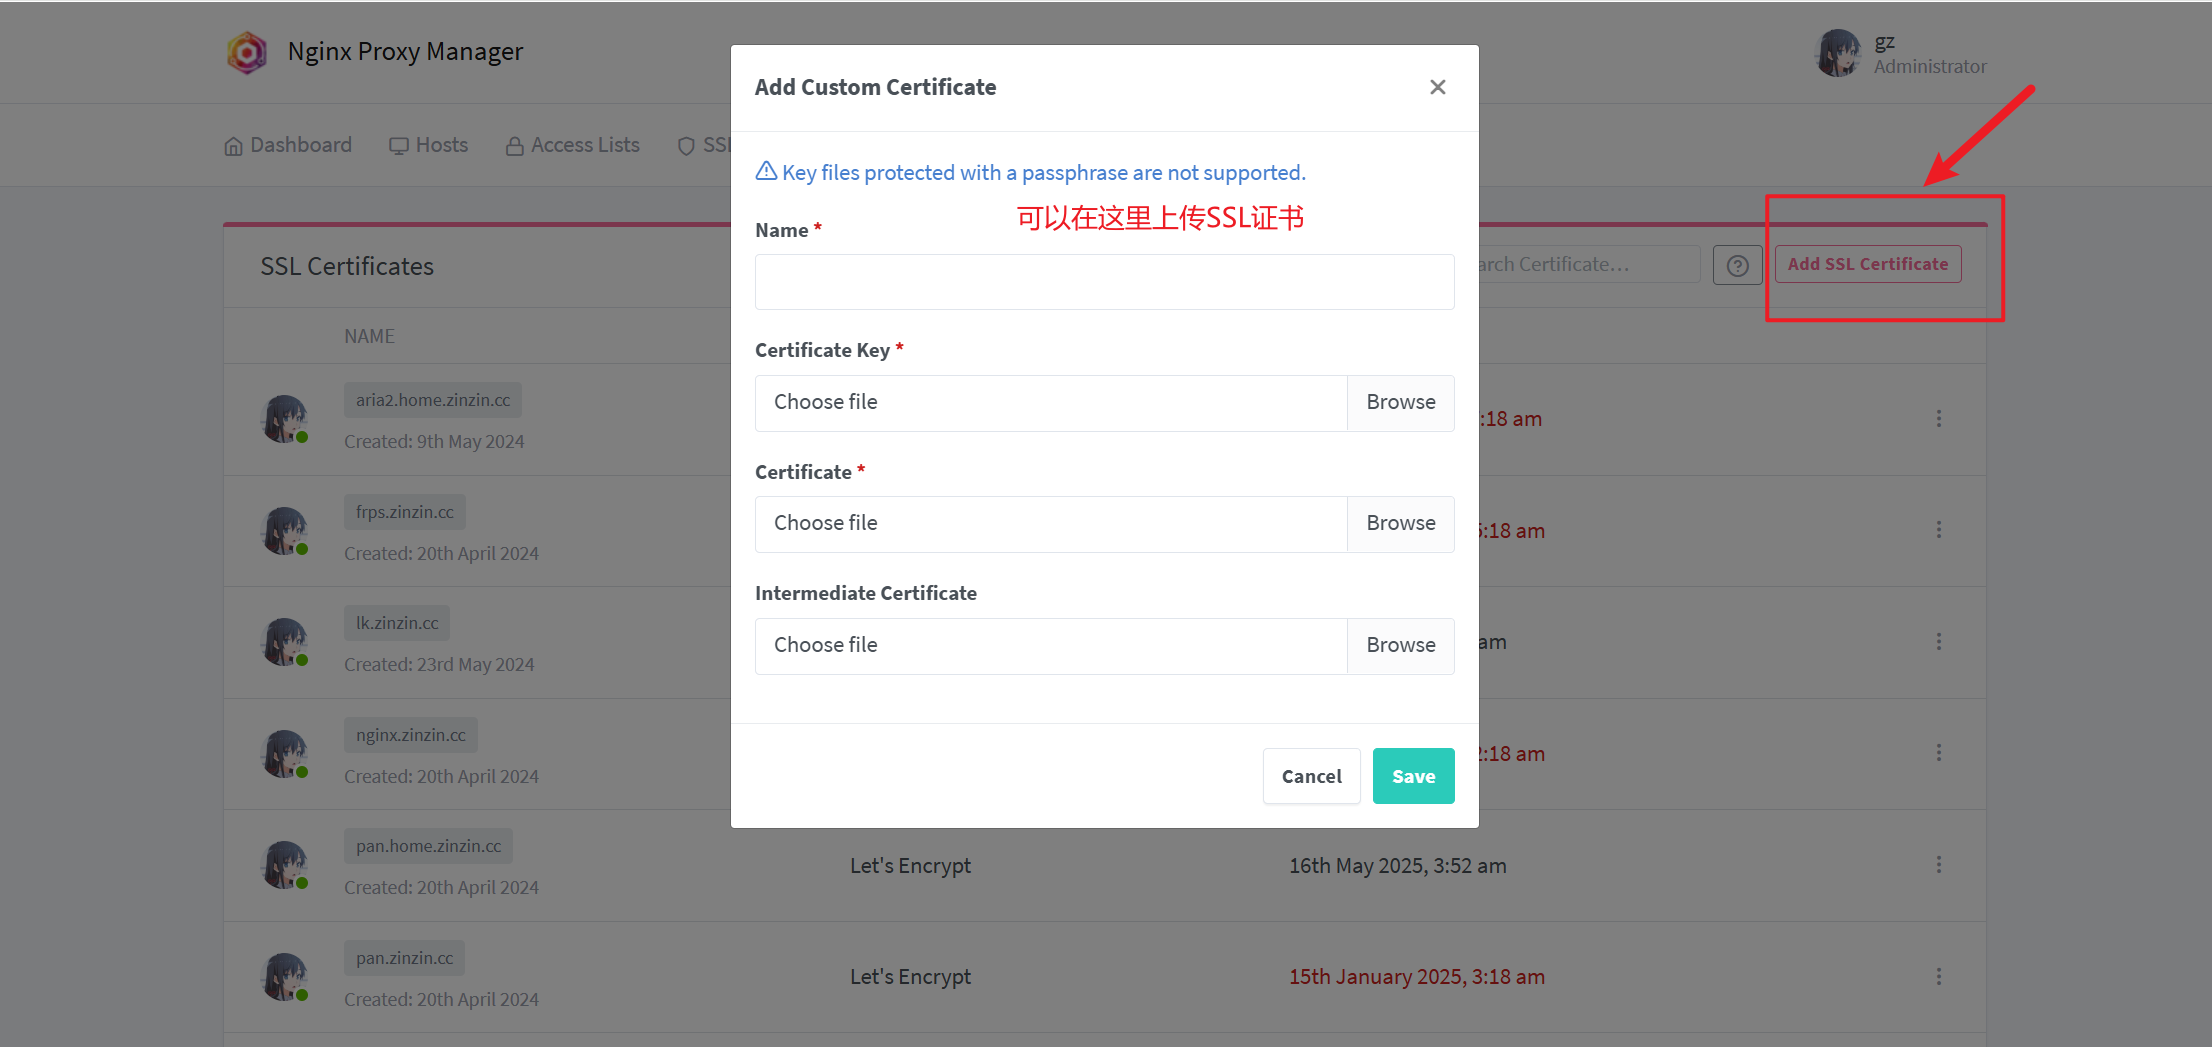
如国内服务器使用 Nginx Proxy Manager 自动申请一直网络错误失败,可在国内对应域名厂商手动申请证书后,根据证书后缀上传至 Nginx Proxy Manager 即可。
支持与分享
如果这篇文章对你有帮助,欢迎分享给更多人或打赏支持!
 提供 CDN 加速